iOS UIButton 选中状态下点击高亮图片显示
今天在做播放控制模块时,对于播放按钮的两种状态,使用 UIControlStateNormal 和 UIControlStateSelected 两种状态来表示,但添加图片后,选中的状态高亮图片始终无法显示出来,经过摸索后,想起 iOS 里是可以使用或运算符来进行组合表示的,所以尝试使用或运算符 组合表示看会不会得到自己想要的结果。
[playButton setImage:[UIImage imageWithUnCachedName:[HJMusicPlayBundle stringByAppendingPathComponent:@"cm2_fm_btn_pause_prs"]] forState:UIControlStateSelected | UIControlStateHighlighted];如我所愿,按钮在选中状态可以显示高亮图片。
PS : 学习中需要多总结以往的知识
iOS 根据文本的高度获取文本的行数
今天APP改版,需要在cell里动态设置标题的高度,并且最大只能显示两行,仔细想了下这个问题。其实动态设置一个label的高度,主要还是能在label进行布局前,能够拿到label内容的行数。如果label内容是一行或者两行则直接显示,如果是两行以上则需要提前设置label的高度。
获取label内容的高度:
- 获取label内容的高度
- 获取label内容的行数
- 获取label内容的实际高度
//label 内容的高度
CGRect titleRect = [titleAttr boundingRectWithSize:CGSizeMake(titleLableMarginWidth, MAXFLOAT) options:NSStringDrawingUsesLineFragmentOrigin context:nil];
//label 内容的行数
NSInteger lineCount = titleRect.size.height / titleLabelFont.lineHeight;
//获取label的实际高度
CGFloat titleLabelHeight = MIN(2, lineCount) * titleLabelFont.lineHeight;
仅此作为实际开发中的笔记,以备周末总结查看。
CocoaPods: pod search 搜索类库失败的解决办法
相信有的小伙伴已经成功安装了CocoaPods,也可以正常使用,然而会发现执行
pod search来搜索类库信息时,却总是[!] Unable to find a pod with name, author, summary, or descriptionmatching '······'。在此我分享一下自己的经验,希望能给您提供帮助。(此贴是在成功安装CocoaPods,但不能pod search搜素类库的情况下探讨问题)。
执行pod setup
- 其实在你安装CocoaPods执行pod install时,系统会默认操作pod setup,然而由于中国强大的墙可能会pod setup不成功。这时就需要手动执行pod
setup指令,如下: - 终端输入:
pod setup会出现Setting up CocoaPods master repo,稍等几十秒,最底下会输出Setup completed。说明执行pod
setup成功。 - 如果pod search操作还是搜索失败,如下:
终端输入:pod search AFNetworking
输出:Unable to find a pod with name, author, summary, or descriptionmatching 'AFNetworking' 这时就需要继续下面的步骤
了。- 其实在你安装CocoaPods执行pod install时,系统会默认操作pod setup,然而由于中国强大的墙可能会pod setup不成功。这时就需要手动执行pod
删除~/Library/Caches/CocoaPods目录下的search_index.json文件
- pod setup成功后,依然不能pod search,是因为之前你执行pod search生成了search_index.json,此时需要删掉。
- 终端输入:rm ~/Library/Caches/CocoaPods/search_index.json
删除成功后,再执行pod search。
- 执行pod search
- 终端输入:pod search afnetworking(不区分大小写)
- 输出:Creating search index for spec repo 'master'.. Done!,稍等片刻······就会出现所有带有afnetworking字段的类库。
原文:[
CocoaPods: pod search 搜索类库失败的解决办法](http://blog.cocoachina.com/article/29127)
动态更改 UITableView Footer 高度
override 所在UIViewController的 viewDidLayoutSubviews方法
override func viewDidLayoutSubviews() {
    super.viewDidLayoutSubviews()

    if let footView = tableView.tableFooterView {
    //footerContentView 是footerView的内容视图,它使用自动布局来自适应高度,然后在代码里面获取高度变更footerView 的高度
        let height = footerContentView.systemLayoutSizeFittingSize(UILayoutFittingCompressedSize).height
        if height != footerView.frame.height {
            print("new height=\(height)")
            footView.frame.size.height = height
            tableView.tableFooterView = footView
        }
    }
}
iOS,利用URL Schemes跳转到设置wifi、蜂窝移动网络页面
一、跳转到“设置”
//>=iOS8.0可用
[[UIApplication sharedApplication] openURL:[NSURL URLWithString:UIApplicationOpenSettingsURLString]];二、跳转到设置的其它位置
1. 首先针对Info.plist添加如下选项
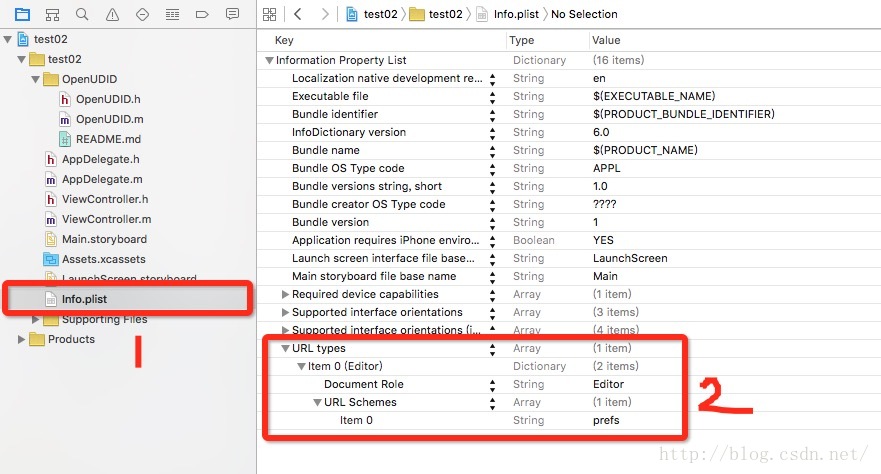
2. 调用跳转代码,如下
//跳转到“About”(关于本机)页面
NSURL *url = [NSURL URLWithString:@"prefs:root=General&path=About"];
if ([[UIApplication sharedApplication] canOpenURL:url]) {
    [[UIApplication sharedApplication] openURL:url];
} else {
    NSLog(@"can not open");
}
三. 附,“设置”中各个页面的“地址”
About — prefs:root=General&path=About
Accessibility — prefs:root=General&path=ACCESSIBILITY
Airplane Mode On — prefs:root=AIRPLANE_MODE
Auto-Lock — prefs:root=General&path=AUTOLOCK
Brightness — prefs:root=Brightness
Bluetooth — prefs:root=General&path=Bluetooth
Date & Time — prefs:root=General&path=DATE_AND_TIME
FaceTime — prefs:root=FACETIME
General — prefs:root=General
Keyboard — prefs:root=General&path=Keyboard
iCloud — prefs:root=CASTLE
iCloud Storage & Backup — prefs:root=CASTLE&path=STORAGE_AND_BACKUP
International — prefs:root=General&path=INTERNATIONAL
Location Services — prefs:root=LOCATION_SERVICES
Music — prefs:root=MUSIC
Music Equalizer — prefs:root=MUSIC&path=EQ
Music Volume Limit — prefs:root=MUSIC&path=VolumeLimit
Network — prefs:root=General&path=Network
Nike + iPod — prefs:root=NIKE_PLUS_IPOD
Notes — prefs:root=NOTES
Notification — prefs:root=NOTIFICATIONS_ID
Phone — prefs:root=Phone
Photos — prefs:root=Photos
Profile — prefs:root=General&path=ManagedConfigurationList
Reset — prefs:root=General&path=Reset
Safari — prefs:root=Safari
Siri — prefs:root=General&path=Assistant
Sounds — prefs:root=Sounds
Software Update — prefs:root=General&path=SOFTWARE_UPDATE_LINK
Store — prefs:root=STORE
Twitter — prefs:root=TWITTER
Usage — prefs:root=General&path=USAGE
VPN — prefs:root=General&path=Network/VPN
Wallpaper — prefs:root=Wallpaper
Wi-Fi — prefs:root=WIFI
Setting —prefs:root=INTERNET_TETHERING
CMPedometer(计步器)使用,获取用户行走步数、距离等信息
用途
CMPedometeri,iOS8.0及以后系统可以使用,统计某段时间内用户步数,距离信息。
代码实现
引入框架CoreMotion.framework
#import <CoreMotion/CoreMotion.h> @property (strong, nonatomic) CMPedometer *pedonmeter; _pedonmeter = [[CMPedometer alloc] init];
if ([CMPedometer isStepCountingAvailable]) {
[_pedonmeter queryPedometerDataFromDate:[NSDate dateWithTimeIntervalSinceNow:-60*60*24*2] toDate:[NSDate dateWithTimeIntervalSinceNow:-60*60*24*1] withHandler:^(CMPedometerData * _Nullable pedometerData, NSError * _Nullable error) {
if (error)
{
NSLog(@"error===%@",error);
}
else {
NSLog(@"步数===%@",pedometerData.numberOfSteps);
NSLog(@"距离===%@",pedometerData.distance);
}
}];
}else{
NSLog(@"不可用===");
}错误处理
如果出现以下错误,是因为CMPedometer回调时,对象已经没有了,所以声明为属性就可以了。
Error Domain=CMErrorDomain Code=103 "The operation couldn’t be completed. (CMErrorDomain error 103.)"UICollectionView 的使用方法及demo
直接上代码,说明请看注释吧
ViewController.h
#import <UIKit/UIKit.h>

@interface ViewController : UIViewController<UICollectionViewDataSource,UICollectionViewDelegateFlowLayout>{

}
@property (strong, nonatomic)UICollectionView *collectionView;

@end
ViewController.m
#import "ViewController.h"

@interface ViewController ()

@end

@implementation ViewController

- (void)viewDidLoad
{
    [super viewDidLoad];

    //确定是水平滚动,还是垂直滚动
    UICollectionViewFlowLayout *flowLayout=[[UICollectionViewFlowLayout alloc] init];
    [flowLayout setScrollDirection:UICollectionViewScrollDirectionVertical];

    self.collectionView=[[UICollectionView alloc] initWithFrame:CGRectMake(0, 64, 320, 200) collectionViewLayout:flowLayout];
    self.collectionView.dataSource=self;
    self.collectionView.delegate=self;
    [self.collectionView setBackgroundColor:[UIColor clearColor]];

    //注册Cell,必须要有
    [self.collectionView registerClass:[UICollectionViewCell class] forCellWithReuseIdentifier:@"UICollectionViewCell"];

    [self.view addSubview:self.collectionView];
}


#pragma mark -- UICollectionViewDataSource

//定义展示的UICollectionViewCell的个数
-(NSInteger)collectionView:(UICollectionView *)collectionView numberOfItemsInSection:(NSInteger)section
{
    return 10;
}

//定义展示的Section的个数
-(NSInteger)numberOfSectionsInCollectionView:(UICollectionView *)collectionView
{
    return 2;
}

//每个UICollectionView展示的内容
-(UICollectionViewCell *)collectionView:(UICollectionView *)collectionView cellForItemAtIndexPath:(NSIndexPath *)indexPath
{
    static NSString * CellIdentifier = @"UICollectionViewCell";
    UICollectionViewCell * cell = [collectionView dequeueReusableCellWithReuseIdentifier:CellIdentifier forIndexPath:indexPath];

    cell.backgroundColor = [UIColor colorWithRed:((10 * indexPath.row) / 255.0) green:((20 * indexPath.row)/255.0) blue:((30 * indexPath.row)/255.0) alpha:1.0f];
    UILabel *label = [[UILabel alloc] initWithFrame:CGRectMake(0, 0, 20, 20)];
    label.textColor = [UIColor redColor];
    label.text = [NSString stringWithFormat:@"%d",indexPath.row];

    for (id subView in cell.contentView.subviews) {
        [subView removeFromSuperview];
    }
    [cell.contentView addSubview:label];
    return cell;
}

#pragma mark --UICollectionViewDelegateFlowLayout

//定义每个Item 的大小
- (CGSize)collectionView:(UICollectionView *)collectionView layout:(UICollectionViewLayout*)collectionViewLayout sizeForItemAtIndexPath:(NSIndexPath *)indexPath
{
    return CGSizeMake(60, 60);
}

//定义每个UICollectionView 的 margin
-(UIEdgeInsets)collectionView:(UICollectionView *)collectionView layout:(UICollectionViewLayout *)collectionViewLayout insetForSectionAtIndex:(NSInteger)section
{
    return UIEdgeInsetsMake(5, 5, 5, 5);
}

#pragma mark --UICollectionViewDelegate

//UICollectionView被选中时调用的方法
-(void)collectionView:(UICollectionView *)collectionView didSelectItemAtIndexPath:(NSIndexPath *)indexPath
{
    UICollectionViewCell * cell = (UICollectionViewCell *)[collectionView cellForItemAtIndexPath:indexPath];
    //临时改变个颜色,看好,只是临时改变的。如果要永久改变,可以先改数据源,然后在cellForItemAtIndexPath中控制。(和UITableView差不多吧!O(∩_∩)O~)
    cell.backgroundColor = [UIColor greenColor];
    NSLog(@"item======%d",indexPath.item);
    NSLog(@"row=======%d",indexPath.row);
    NSLog(@"section===%d",indexPath.section);
}

//返回这个UICollectionView是否可以被选择
-(BOOL)collectionView:(UICollectionView *)collectionView shouldSelectItemAtIndexPath:(NSIndexPath *)indexPath
{
    return YES;
}

@end点击 UITableView 的 footerView 上的 button 不响应问题
今天在使用UITableView时,在tableView的footerView上添加了一个button,控件显示正常,但当我点击该button时,button不能响应点击事件。通过尝试将该button放到其他view上,可以看到该button可以正常响应点击事件。可以判断是该button所在的view影响了事件的响应。
使用Reveal查看整个页面,发现footerView的高度为0.
于是恍然大悟,控件没有高度,是无法响应事件的。添加如下代码:
- (CGFloat)tableView:(UITableView *)tableView heightForFooterInSection:(NSInteger)section {
    return 100;
}
给footerView一个高度,button事件响应正常。